Lunar Dap

LunarVim DAP 简单配置
最开始使用 vim 是因为其不同的模式以及纯键盘操作文本的帅气,但是后来发现,这些操作不止 cool 还让文本编辑变得相当高效(编写程序时), 但是毕竟 vim 只是一个文本编辑器,许多 IDE 的便捷功能无法直接实现,但是插件可以实现。而且社区中还存在 vim 的 folk 版本即 neovim。更是拥有相当多的功能各异的插件,这些插件已经能满足我的日常学习开发了。(前面是记录如何配置,效果在后面喔😜)
NeoVim && LunarVim
neovim 在 vim 的基础上做改进与优化,就目前我的观点来看最让人舒适的便是 neovim 使用 lua 语言来对 neovim 进行配置,(很多人之前吐槽 vimscript[vim 的配置脚本语言], 但是 vim9 开始的新的 vimscript 或许能带来许多不同与性能上的提升)。 社区中除开有很多 neovim 的插件,还有很多一体化,将 neovim 配置为堪比 IDE 的配置集合,LunarVim 就是其中之一。
DAP
在经历了一段时间的自行配置 vim, 以及 neovim 之后。此时我对 vim 的使用已经渗入到了日常,需求也日益向 IDE 靠近(虽然需要一些 IDE 的功能, 但是最让我不想使用 IDE 的一个理由便是鼠标和键盘的无法统一。emacs,vim 等都可以用键盘来做一切事情,但是 IDE 总给我一种鼠标是必须的感觉, 虽然我本身也在尽力去降低这样的感觉比如在 vscode, JetBrain 中安装 vim 插件, 但是最让人舒服的还是"原始"一些的 vim 和 emacs),对于当下而言需求是配置 debug 功能, 这个在当下高度集成的 IDE 内看起来十分自然的功能。
debug 以及相关 UI 实现起来十分费事,不同的编辑器可能都会有自己的实现方式,许多功能重复但是实现方式不同,给功能的复用带来相当大的困难也增加了开发的工程量。
微软便想通过一个协议来标准化这种开发,DAP 也就这么来了。(当然除了 DAP, LSP 也是微软的杰作(Language Server Protocol))。
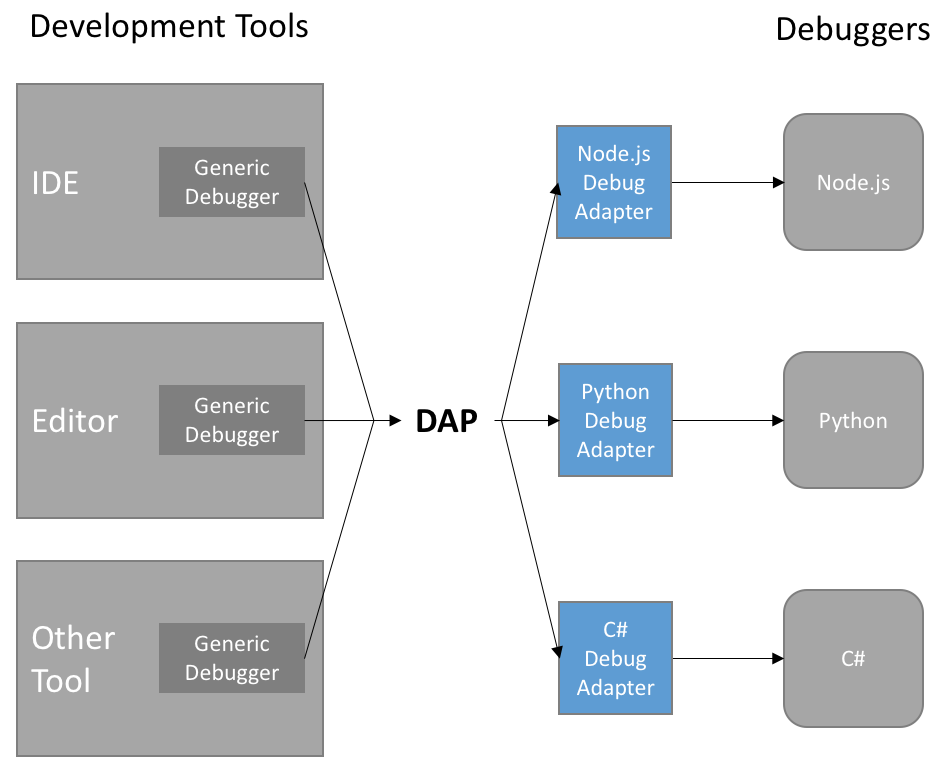
DAP-Client ----- Debug Adapter ------- Debugger ------ Debugee
(nvim-dap)  |   (per language)  |   (per language)    (your app)
            |                   |
            |        Implementation specific communication
            |        Debug adapter and debugger could be the same process
            |
     Communication via the Debug Adapter Protocol
有了 nvim-dap 之后,我们需要配置的部分便是 debug adapter 以及如何启动程序了(dap-configuration)
简单配置
得益于 lua 语言的模块特性,最主要的 config.lua 文件内我只放置了几个基本的模块,其他配置都分布在基本模块内,这样保持了主要配置文件的简洁。 config.lua
-- general
-- buildin配置
require('users.buildin.buildin')
-- keybindings
-- 快捷键配置
require('users.keybindings.key')
-- user plugins
-- 插件
require('users.plugins.plgs')
-- dap config
-- debug配置文件
require('users.dap-configs.daps')
此处 require 进来的模块实际是一个文件,而此文件的路径就在 ~/.config/lvim/lua/users/dap-configs/ , 名字为 lua 的文件夹会默认为顶层文件夹不需要特别指出。
在 daps.lua 文件内我再次加入其他模块,这次是不同语言的 dap 模块。(因为 nvim-dap 本身也是适配器,所以不用再安装其他,但是这里只是配置 dap 本身没有好看的 ui 界面,需要的话可以去看看 nvim-dap-ui, nvim-dap-virtual-text 等插件)
-- codelldb debug 配置
-- cpp, c debug配置
require('users.dap-configs.dap-codelldb.cfg')
-- python debug配置
require('users.dap-configs.dap-python.cfg')
-- go debug 配置
require('users.dap-configs.dap-go.cfg')
-- rust debug 配置
-- 也可以使用rust-tools下RustDebugee命令触发
require('users.dap-configs.dap-rust.cfg')
不同文件的 dap 配置代表这我日常使用的几门编程语言(还有一些语言因为时间问题没有配置,如 Dart, Java, Kotlin, JavaScript),C++, C, Python, Go, Rust。
C/C++
c 和 c++使用相同的 adapter 配置以及 configuration
注意:
使用这个 C++配置的前提是安装了 awk,其中一些字符串的获取使用了 awk 来提取
-- 引入dap模块
local dap = require('dap')

dap.adapters.lldb = {
  type = "executable",
--[[
	配置adapter可执行文件路径, 注意这里的lldb-vscode需要用自己的实际路径
	这里的lldb-vscode可执行文件从我的路径可以看出,实际上是从llvm中编译出来的。
	后面会一步一步解释怎么编译lldb-vscode以及lldb-server
]]
  command = "/home/liuzehao/source/llvm-root/build/bin/lldb-vscode",
  -- 这里的name对应下面configurations中的type
  name = "lldb",
}

local get_args = function()
  -- 获取输入命令行参数
  local cmd_args = vim.fn.input('CommandLine Args:')
  local params = {}
  -- 定义分隔符(%s在lua内表示任何空白符号)
  local sep = "%s"
  for param in string.gmatch(cmd_args, "[^%s]+") do
    table.insert(params, param)
  end
  return params
end;

local function get_executable_from_cmake(path)
  -- 使用awk获取CMakeLists.txt文件内要生成的可执行文件的名字
  -- 有需求可以自己改成别的
  local get_executable = 'awk "BEGIN {IGNORECASE=1} /add_executable\\s*\\([^)]+\\)/ {match(\\$0, /\\(([^\\)]+)\\)/,m);match(m[1], /([A-Za-z_]+)/, n);printf(\\"%s\\", n[1]);}" '
      .. path .. "CMakeLists.txt"
  return vim.fn.system(get_executable)
end

dap.configurations.cpp = {
  {
    name = "Launch file",
    type = "lldb",
    request = "launch",
    program = function()
      local current_path = vim.fn.getcwd() .. "/"
      -- 使用find命令找到Makefile或者makefile
      local fd_make = string.format('find %s -maxdepth 1 -name [m\\|M]akefile', current_path)
      local fd_make_result = vim.fn.system(fd_make)
      if (fd_make_result ~= "")
      then
        local mkf = vim.fn.system(fd_make)
        -- 使用awk默认提取Makefile(makefile)中第一个的将要生成的可执行文件名称
        -- 有需求可以自己改成别的
        local cmd = 'awk "\\$0 ~ /:/ { match(\\$1, \\"([A-Za-z_]+)\\", m); printf(\\"%s\\", m[1]); exit; }" ' .. mkf
        local exe = vim.fn.system(cmd)
        -- 执行make命令
        -- Makefile里面需要设置CXXFLAGS变量哦~
        if (os.execute('make CXXFLAGS="-g"'))
        then
          return current_path .. exe
        end
      end
      -- 查找CMakeLists.txt文件
      local fd_cmake = string.format("find %s -name CMakeLists.txt -type f", current_path)
      local fd_cmake_result = vim.fn.system(fd_cmake)
      if (fd_cmake_result == "")
      then
        return vim.fn.input("Path to executable: ", current_path, "file")
      end
      -- 查找build文件夹
      local fd_build = string.format("find %s -name build -type d", current_path)
      local fd_build_result = vim.fn.system(fd_build)
      if (fd_build_result == "")
      then
        -- 不存在则创建build文件夹
        if (not os.execute(string.format('mkdir -p %sbuild', current_path)))
        then
          return vim.fn.input("Path to executable: ", current_path, "file")
        end
      end
      local cmd = 'cd ' .. current_path .. "build && cmake .. -DCMAKE_BUILD_TYPE=Debug"
      -- 开始构建项目
      print("Building The Project...")
      vim.fn.system(cmd)
      local exec = get_executable_from_cmake(current_path)
      local make = 'cd ' .. current_path .. 'build && make'
      local res = vim.fn.system(make)
      if (exec == "" or res == "")
      then
        return vim.fn.input("Path to executable: ", current_path, "file")
      end
      return current_path .. "build/" .. exec
    end,
    cwd = "${workspaceFolder}",
    stopOnEntry = false,
    args = get_args,
  },
}
dap.configurations.c = dap.configurations.cpp
这个配置文件看着挺长,其实还是比较简单的,大体逻辑就是:
- 首先判断当前项目目录下有没有 Makefile 或者 makefile 文件有的话就执行 make 并且默认获得 make 最开始一行的目标字符串作为最终可执行文件的名字进行 debug。
- 如果没有 Makefile 或者 makefile 文件就查看是否存在 CMakeLists.txt 文件,有的话在查看是否存在 build 文件夹,有的话就进入进行 make 并且获取 CMakeLists.txt 文件内的可执行文件名称, 用于 debug(这里具体逻辑没有讲清楚,太懒了,但是代码都在了懂我意思应该问题不大)。
- 简述最后一种情况就是直接输入可执行文件位置进行 debug。
lldb-vscode && lldb-server 源码编译
Linux 下(Windows, 下目前我基本不写代码,所以只记录 Linux 下的情况咯)执行下列语句, 得到 llvm 源代码(当然编译需要一些依赖比如 clang, cmake, ninja 等,这个在 llvm 的官网是有的,这里就不多说啦)
git clone https://github.com/llvm/llvm-project.git
cd llvm-project
mkdir -pv build
# 你也可以参考官网查看其他的cmake选项
cmake ../llvm -G Ninja -DCMAKE_BUILD_TYPE=Release \
					   -DLLVM_ENABLE_PROJECTS="clang;lldb"
ninja lldb-vscode lldb-server
这个过程尽管使用了 ninja 比较激进(在我看来)的构建系统, 我的笔记本 cpu 全部跑满也用了 20 分钟左右, 顺带提一下我的笔记本配置
OS: Garuda Linux x86_64
Host: HP Pavilion Gaming Laptop 15-dk1x
Shell: fish 3.5.1
Kernel: 6.0.11-zen1-1-zen
Resolution: 1920x1080, 1920x1080, 1920x1080
WM: i3
CPU: Intel i7-10750H (12) @ 5.000GHz
GPU: NVIDIA GeForce RTX 2060 Max-Q
GPU: Intel CometLake-H GT2 [UHD Graphic]
Memory: 12797MiB / 31901MiB
Disk (/): 44G / 99G (45%)
Disk (/home): 196G / 855G (23%)
在编译完成之后会在 build 目录下存在一个 bin 文件夹,里面便会有 lldb-vscode 以及 lldb-server 两个可执行文件, 因为我的 shell 是 fish,偷懒直接使用 fish_add_path 将 bin 所在路径加入 path
# 进入build下的bin目录
cd bin
fish_add_path $PWD
其他诸如 zsh,bash 等可以在 .zshrc , .zshenv, .bashrc, .bash_profile 等家目录的 shell 配置文件内添加下面的一行
# 这里路径根据实际情况来
export PATH=/path/to/llvm/build/bin:$PATH
然后记得重新激活一下配置, 具体是啥 shell,就自己琢磨啦
# zsh
. ~/.zshrc # or source ~/.zshrc
# bash
. ~/.bashrc # or source ~/.bashrc
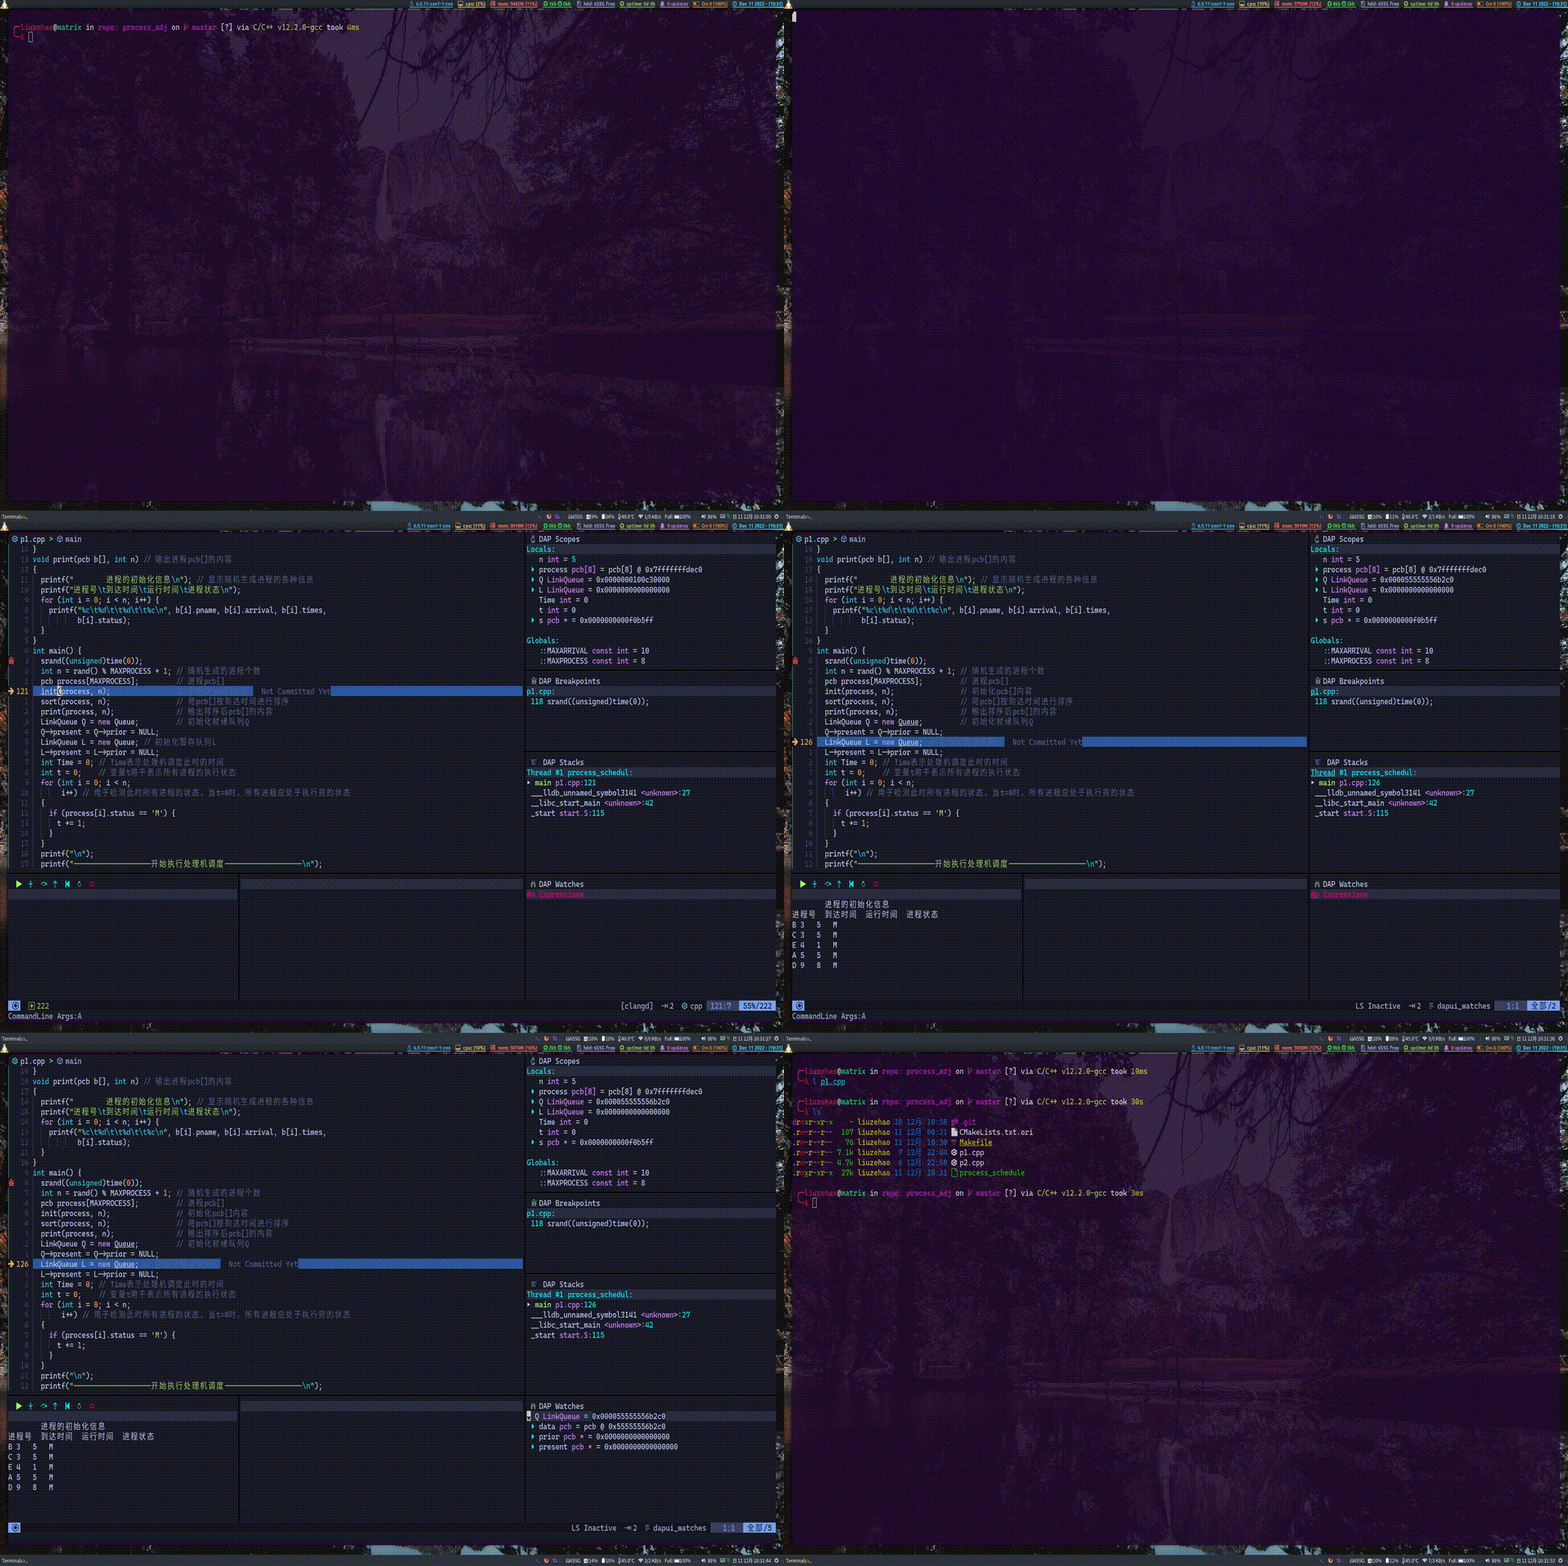
使用 lunarvim 打开 p1.cpp 文件
<Leader>dt (这里的 Leader 是我自己定义的,这也没啥好说的,既然都看 lunarvim 了这个 Leader 键不至于不知道)在想要的位置打断点, <Leader>ds 开始 debug, 当然<Leader>d 可以通过 which-key 或者命令模式下 :map 查看其他快捷键选项
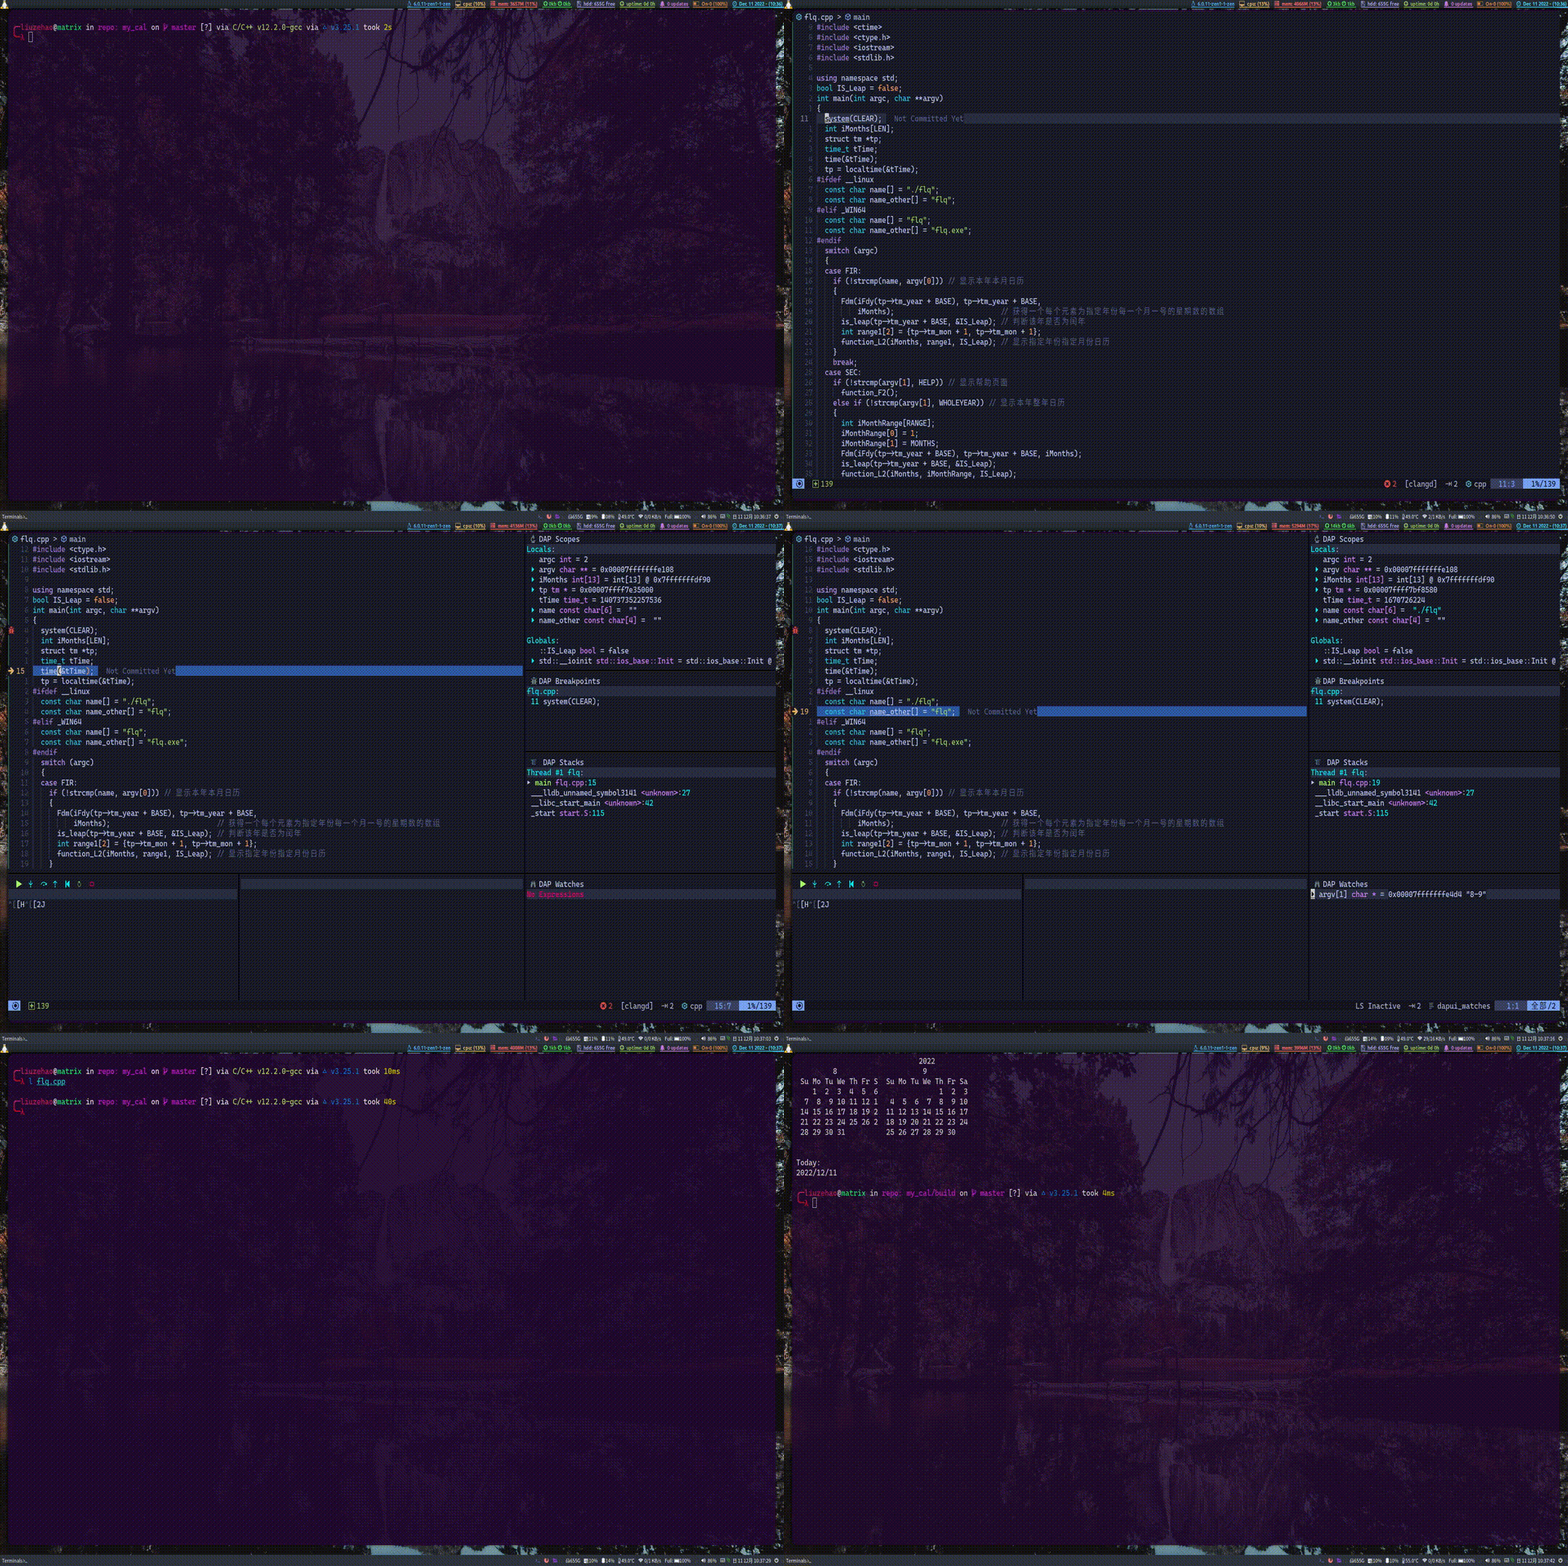
在开始之后需要输入编译好的可执行文件位置,输入回车之后便开始了 debug(这里的界面可以参考 nvim-dap-ui, nvim-dapvisual-text 等插件的相关配置)
下面分别是项目目录下有 Makefile 或者 CMakeLists.txt 的情况
Makefile
CMakeList.txt
当然这一顿操作,其实不只是 cpp 和 c 可以使用,之后的 Rust 也是可以用的啦
Python
同样需要 adapters 以及 configurations, 直接上配置
local dap = require('dap')

--[[
当然还有其他更多选项可以用啦,看标题就知道这只是简单配置一下,我的目前时间也不多就暂时能用就行,
主要还是向能脱离IDE
]]

dap.adapters.python = {
  type = "executable";
  command = '/usr/bin/python';
  args = { '-m', 'debugpy.adapter' };
}

local get_args = function()
  -- 获取输入命令行参数
  local cmd_args = vim.fn.input('CommandLine Args:')
  local params = {}
  -- 定义分隔符(%s在lua内表示任何空白符号)
  local sep = "%s"
  for param in string.gmatch(cmd_args, "[^%s]+") do
    table.insert(params, param)
  end
  return params
end;


dap.configurations.python = {
  {
    type = 'python';
    request = 'launch';
    name = 'launch file';
-- 此处指向当前文件
    program = '${file}';
    args = get_args;
    pythonpath = function()
      return '/usr/bin/python'
    end;
  },
}
debug 的流程和 cpp 是一样的毕竟都是 nvim-dap 作为客户端, 下面是一个示例
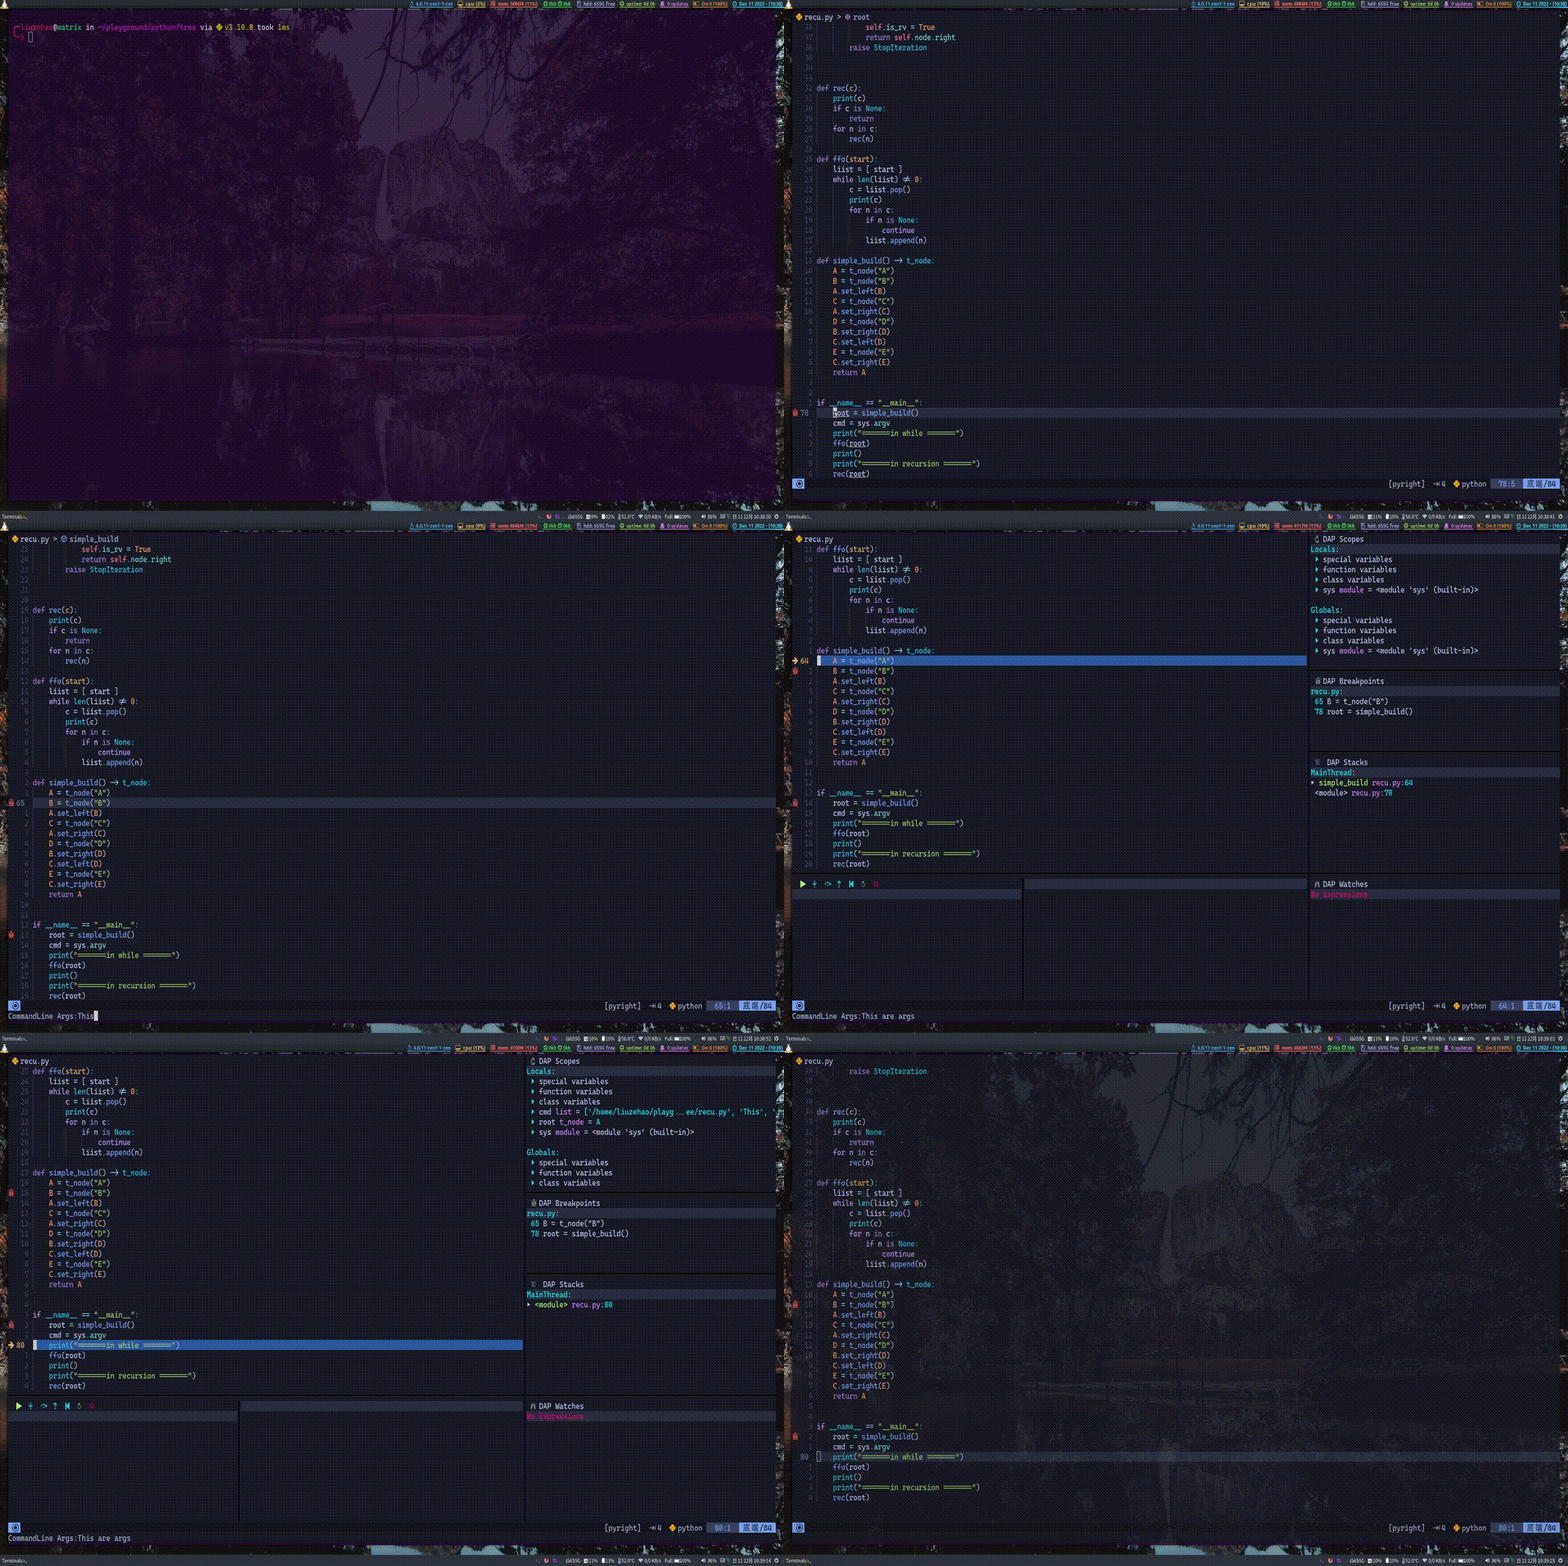
这里说一下 : 在右边 dap watches 窗口可以直接进入插入模式输入表达式进行查看哦
Golang
直接上配置吧,不多说啥
local dap = require('dap')

dap.adapters.go = function(callback, _)
  local stdout = vim.loop.new_pipe(false)
  local handle
  local pid_or_err
  local port = 38697
  local opts = {
    stdio = { nil, stdout },
    args = { "dap", "-l", "127.0.0.1:" .. port },
    detached = true,
  }

  handle, pid_or_err = vim.loop.spawn("dlv", opts, function(code)
    stdout:close()
    handle:close()
    if code ~= 0 then
      print("dlv exited with code", code)
    end
  end)
  assert(handle, "Error running dlv: " .. tostring(pid_or_err))
  stdout:read_start(function(err, chunk)
    assert(not err, err)
    if chunk then
      vim.schedule(function()
        require("dap.repl").append(chunk)
      end)
    end
  end)

  vim.defer_fn(function()
    callback { type = "server", host = "127.0.0.1", port = port }
  end, 100)
end

-- 此处获取命令行输入参数,其他语言的配置也是可以加的啦
-- 主要是这个程序是一个简单的容器实验,模仿实现docker所以需要从命令行输入参数
local get_args = function()
  -- 获取输入命令行参数
  local cmd_args = vim.fn.input('CommandLine Args:')
  local params = {}
  -- 定义分隔符(%s在lua内表示任何空白符号)
  for param in string.gmatch(cmd_args, "[^%s]+") do
    table.insert(params, param)
  end
  return params
end;

dap.configurations.go = {
-- 普通文件的debug
  {
    type = "go",
    name = "Debug",
    request = "launch",
	args = get_args,
    program = "${file}",
  },
-- 测试文件的debug
  {
    type = "go",
    name = "Debug test", -- configuration for debugging test files
    request = "launch",
	args = get_args,
    mode = "test",
    program = "${file}",
  },
}
下面是一个示例
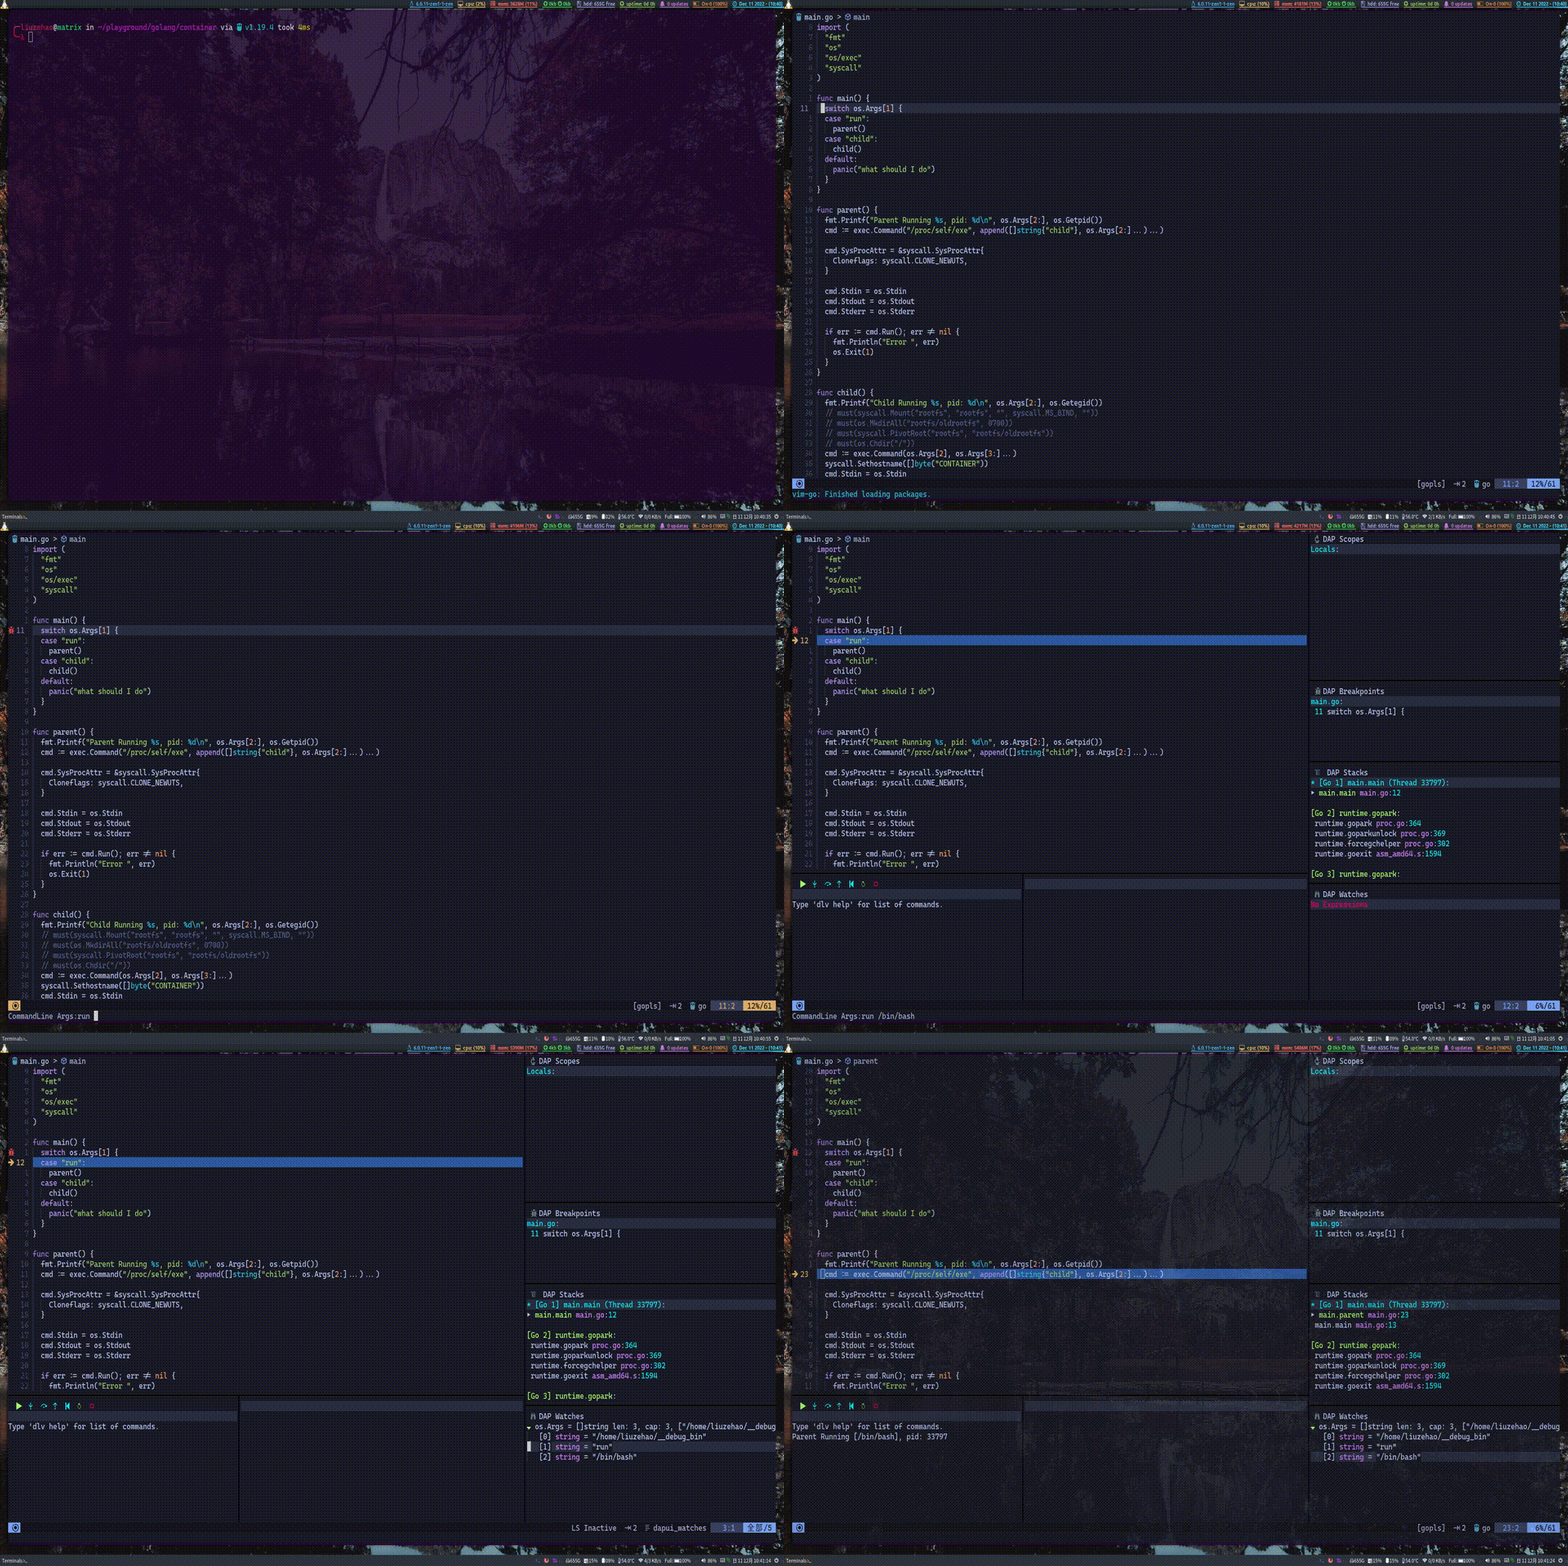
Go 语言的测试文件也是一样,直接在 <Leader>ds 之后选择 Debug test 选项就行了, 但是注意,当前文件要是需要测试的那个文件
Rust
因为之前编译了 lldb-vscode 和 lldb-server 这会儿可以用在 Rust 上了, 直接上配置
local dap = require('dap')
dap.adapters.lldbrust = {
  type = "executable",
  attach = { pidProperty = "pid", pidSelect = "ask" },
  -- 这里指向lldb-vscode的实际路径
  command = "/home/liuzehao/source/llvm-root/build/bin/lldb-vscode",
  env = { LLDB_LAUNCH_FLAG_LAUNCH_IN_TTY = "YES" },
}

dap.adapters.rust = dap.adapters.lldbrust
dap.configurations.rust = {
  {
    type = "rust",
    request = "launch",
    name = "lldbrust",
    program = function()
      local metadata_json = vim.fn.system "cargo metadata --format-version 1 --no-deps"
      local metadata = vim.fn.json_decode(metadata_json)
      local target_name = metadata.packages[1].targets[1].name
      local target_dir = metadata.target_directory
      return target_dir .. "/debug/" .. target_name
    end,
    args = function()
-- 同样的进行命令行参数指定
      local inputstr = vim.fn.input("CommandLine Args:", "")
      local params = {}
      for param in string.gmatch(inputstr, "[^%s]+") do
        table.insert(params, param)
      end
      return params
    end,
  },
}
示例如下
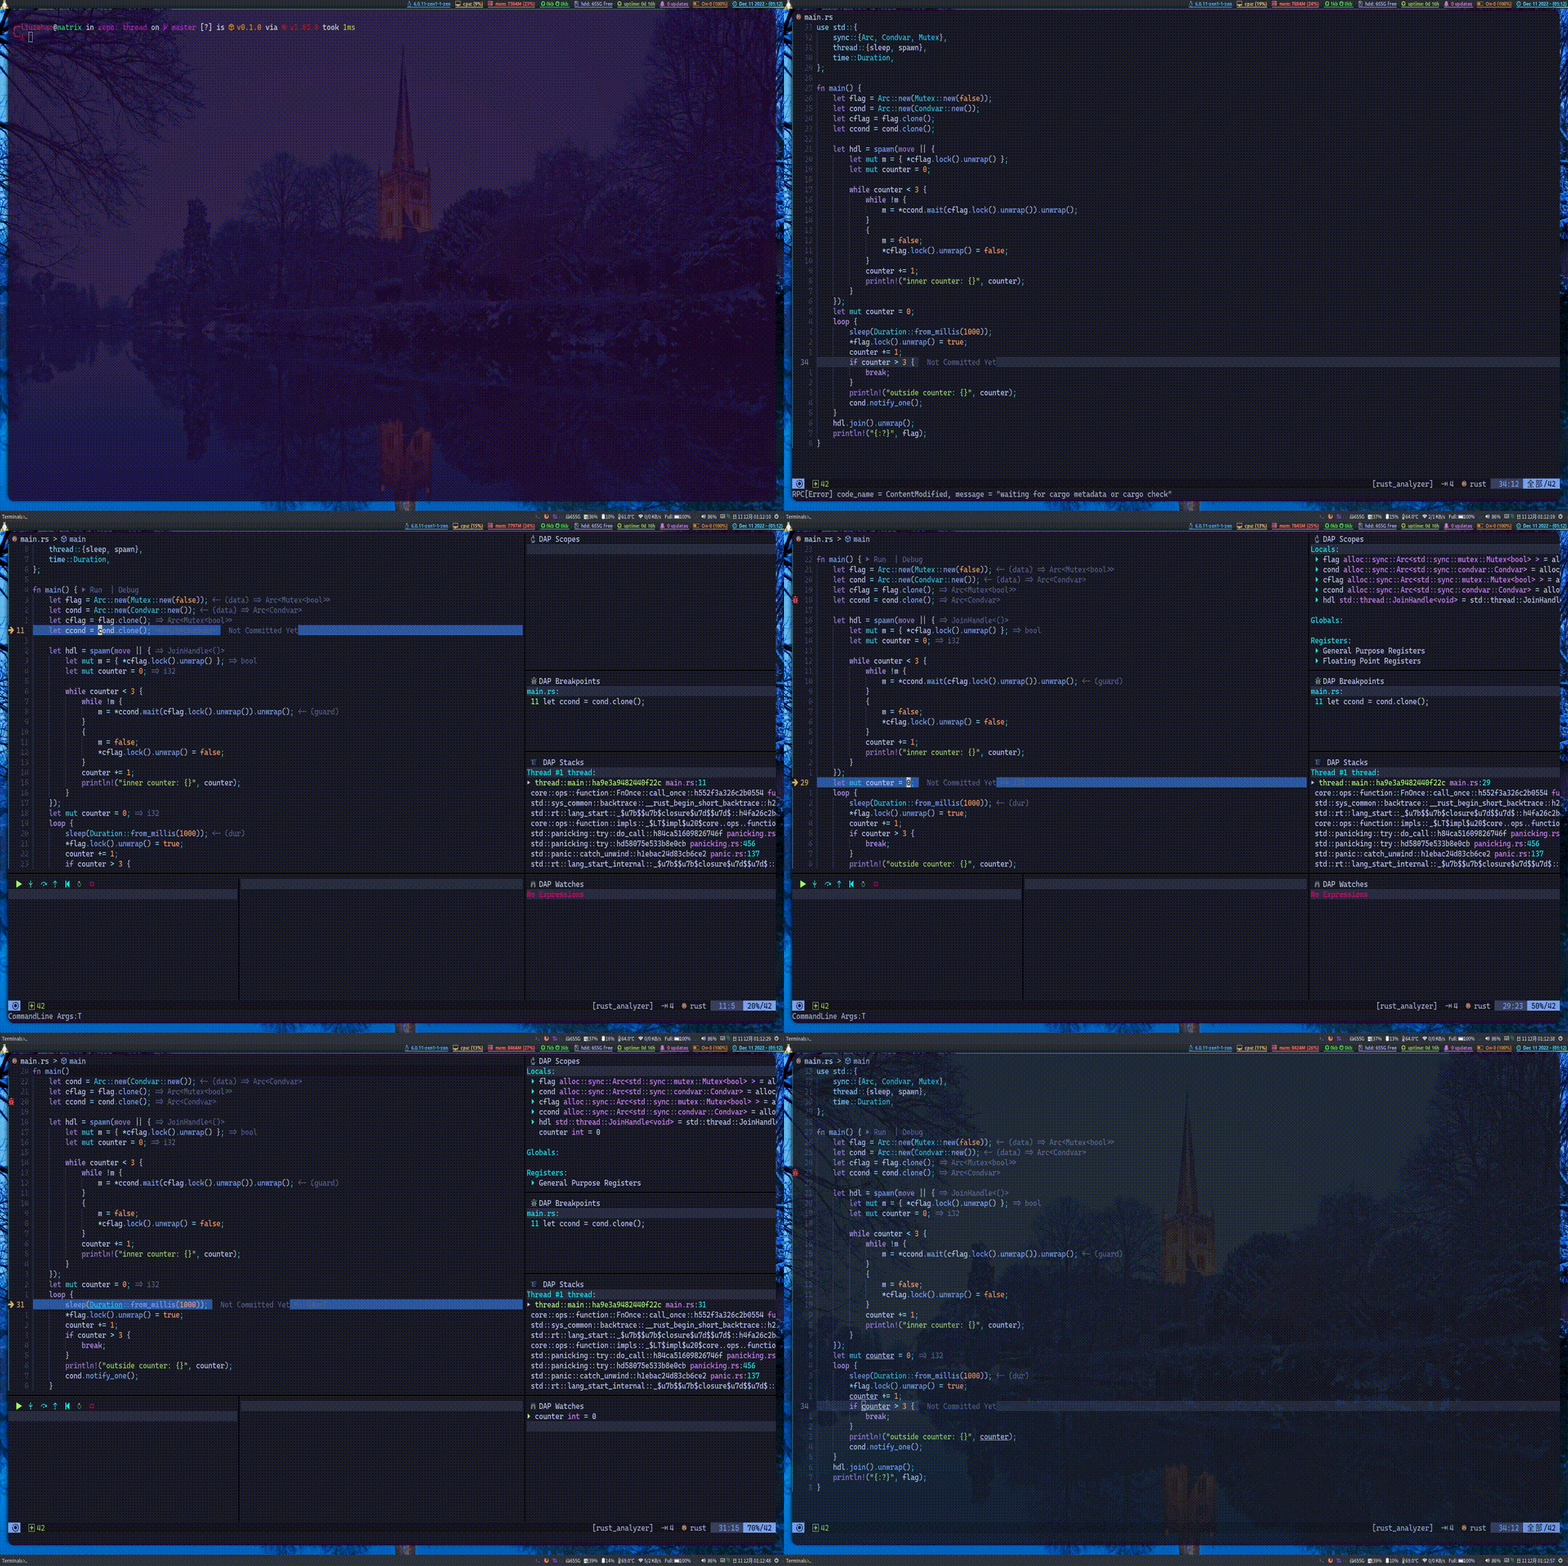
总结
相对于 IDE 来说我还是更倾向于文本编辑器,emacs, sublime,kate 等,也是不错的选择,目前的话我还是 neovim 以及 emacs (主要是org-mode用agenda或者做笔记)二者同时使用(emacs 远不止一个文本编辑器,当然,现在 neovim 配置上插件也远不止), 对于 Android 进行 Kotlin 相关开发会使用 AndroidStudio, 如果使用 Dart, Flutter 来开发程序,偶尔也会使用 vscode 或者在 emacs(之后试试 neovim 上的 flutter-tools 插件,看看 neovim 上的 flutter 开发体验怎么样),所以总体来说还是大部分时间在 neovim 和 emacs 上。所以既然能配置,为啥不配置成自己喜欢的样子呢。加油挖🥳。
评论 (...)
加载中...